Our 'Always On'
User Guide
Consumer Health and Safety
Before you start, here are some warnings and safety points to adhere to when using your cooker.
- The surfaces of the cooker will become HOT when in use.
- Children and vulnerable persons should be continuously supervised when in the vicinity.
- The enamel top and front plate will be hot to the touch. Care should be taken to avoid burns, scalds or scorching of material.
- DANGER OF FIRE: Do not store items on the cooking surfaces.
- Only use approved enamel cleaners on the enamel surfaces. Any caustic or unapproved cleaners can permanently damage your enamel.
- Never submerge the doors or lids in water. Do not put them in a dishwasher. They contain insulation to maintain the efficiency of your cooker.
- Do not hang dish towels or laundry on the left hand side of the Aga handrail. Doing so will block the air vent to the controls, and potentially cause your AGA badge to melt due to excessive build up of steam and heat.
- Do not modify the appliance without seeking approval from Saltire Cookers.
- The floor on which the Aga Range Cooker is situated should be capable of bearing the full weight without any loss of structural integrity - this is your responsibility, and as such, a structural engineer may be required for advice.
- NEVER cook unattended on the hotplates. Oil is a fire risk and you should never fill a pan more than one-third full of fat or oil.
- Enamel doors can be heavy when removed from their hinges. Care must be taken.
- Do not dry laundry directly on the hotplates. There is a risk of scorching and fire. Invest in drying racks to raise any laundry above the direct heat.
- Sealants and Insulation used in the installation process are labelled as non-toxic to human health but might cause coughing with any dust during install. Improved ventilation to the area with plenty of fresh air will help.
The 'Burn Off' Period
For the initial burn off, you'll need to leave your cooker at temperature for 12 to 24hrs, to help seals and coatings etc cure. During this period, your We recommend the below settings.
For Oil Aga Cookers:
Thermostat dial (inside your control door) set to approx 4.
For Gas Aga Cookers:
Control dial on your burner set to the mid-position of the green band, or number approx 6.
For 'Always On' 13amp Aga Cookers:
Thermostat dial (inside your control door) set to between 4 and 5.
(For all models) Leave the lids open for the first half an hour to an hour.
Your traditional model will heat up in around 7hrs from cold. You might notice some smells, smoke and slight sizzling/clanking sounds - this is normal, as the metal parts expand and contract.
After the burn-off, you may need to adjust your settings slightly, to reach the optimum zone inside your thermometer on the front plate. If adjustments are needed, incrementally increase/decrease, and leave the cooker to settle overnight before any further adjustments.
Quick Start Points
- Wipe up any condensation as soon as possible. During the burn off period, you might see some condensation drip from the front return edge of the top plate, down the enamel front plate. This should be wiped away asap. If left, those drips could stain your enamel permanently. It's only a concern during the initial heat up period.
- Your lids should be left up for at least half an hour. Whilst your cooker is initially heating, the coatings and seals may create vapours which can stain the aluminium liners if your lids are closed.
- There will be some sealants, ropes and gaskets used during the installation, which will need time to set and cure. You should avoid dusting or using the Aga for the first few hours at least, to let things set in place.

The Hotplates
The insulating dome lids should be closed over the hotplates when they're not in use. Leaving the lids open will allow heat to escape and increase your running costs.
Multiple pans can be used on the hotplates at one time, but be careful not to drag them across the enamel. Pans will scratch the enamel and repairs are only possible with a full re-enamel service.
You should use pans with a heavy, machined-flat base, to allow full contact with the hotplate surface. If you notice that pans aren't heating as effectively, check that the base is not warped and there are no burnt-on residue preventing contact, either on the pan or the hotplate itself.
Your left-hand hotplate is your Boiling Plate.
The boiling plate is the hottest out of the two, and is used for boiling, griddling, stir-frying, toasting, and anything else that requires a high heat. Green vegetables retain their colour when quickly boiled here, or use a steamer over the saucepan to cook multiple vegetables at once. You can adjust the temperature of whatever you're cooking, by carefully placing it half-on half-off the hotplate. More experienced Aga owners (from back in the day!) used to use pennies or coins to raise the pans off the hotplate which reduces the contact and therefore the temperature in the pan.
You should not cook food directly on your boiling plate.
Your right-hand hotplate is your Simmer Plate.
The simmering plate is the cooler of the two, and is used for recipes requiring a lower heat, such as sauces, scrambling eggs, heating milk, slow frying, simmering soups and root vegetables.
You can use a Bake-O-Glide sheet to cook directly on top of the hotplate for perfect toasted sandwiches, pancakes, drop scones, or non-fat fried eggs. You can even cook toast by sticking it directly onto a sheet of Bake-O-Glide then closing the lid - no need for the AGA toast rack.
4 and 5-oven models have an additional Warming Plate on the left-hand side.
This operates at a lower temperature than the hotplates, which isn't suitable for cooking. It's perfect for keeping plates or dishes warm before serving, or melting butter or chocolate.
The Ovens
Your ovens are designed to be 'always on' and are all heated from the single heat source inside your cooker. When your Aga Cooker is at optimum temperature, your ovens will maintain different temperatures for each oven.
You should always use suitable pans and trays for cooking inside the ovens. If you wanted to cook on the floor of the oven, you should use a baking sheet rather than cooking directly on the floor.
The Roasting Oven (top right oven on all models).
This is the hottest oven for high-temperature cooking, such as pastries and breads, roasting meat, vegetables, grilling at the top of the oven, and frying at the bottom.
The Simmering Oven (bottom right oven on 2 and 3-oven models, top left oven on 4-oven models).
Long, slow cooking in a simmering oven brings out flavours and tenderises even the toughest cuts of meat. Soup, casserole, steamed rice, steamed
carrots, and poached fruits can all be cooked at the same time. If you wanted to simmer a pot, bring it to the boil on the Boiling Plate, then transfer it to the Simmering Oven and it will continue simmering without drying out.
The Baking Oven (bottom left oven on 3-oven models, bottom right oven on 4-oven models).
A medium-heat oven for baking, such as cakes and cookies, fish, lasagne, or shepherd's pie.
The Warming Oven (bottom left oven on 4-oven models)
Similar to the warming plate, the warming oven can be used for warming plates and dishes before serving. It can also be used for resting joints before carving.
Finding Your Cooker Temperature.
It's important to know that every Aga Cooker is unique. If you've had Aga Cookers in the past, you may find that your 'new' model will have it's own personality.
Your ovens use radiant heat to cook food, rather than direct heat found in modern fan ovens - that's why exact temperature readings aren't heard of in Aga-life. We'll give you a guide on rough temperatures for each oven below, which should give you starting point.
(Approximate Temperatures - every Aga is slightly different)
Roasting Oven: 220-240c
Baking Oven: 170-190c
Simmering Oven: 120-140c
Warming Oven: 60-70c
The temperatures will differ depending on where you place your food in the oven and how much heat is stored inside the cast iron panels. This is why you can grill at the top of the roasting oven, roast in the middle and fry at the bottom.
The best way you can make sure your cooker is running at the optimal temperature, is to leave it on for at least 24hrs, then take a temperature reading using an in-oven thermometer first thing in the morning, before cooking. When you cook, the thermometer readings will fluctuate as the stored heat is absorbed into the food and radiated out into the room. This will be replaced once your element/burner has fired for a while.
Once your thermometer has reached a position inside the Normal Zone (Silver zone on your thermometer), you've reached optimal temperature and your ovens will be ready to cook. The thermometer on the front of the Aga shows the operating temperature of the whole cooker - it's not an oven thermometer.
Once your controls on your burner/control panel are set, they shouldn't need to be adjusted.
To minimise heat loss (and loss in temperature) inside your ovens, reduce your hotplate usage. The more you open your hotplate lids, the more heat will be lost from your whole cooker body, including inside your ovens. If you're cooking something that required a high heat inside the ovens like Yorkshire Puddings, you should cook them first, before any of the hotplates have been used and your Aga has the most heat inside.
We recommend watching or attending an AGA Cookery Demonstration, which will give you lots of confidence and hints/tricks on how to use your cooker. Sarah Whitaker is very well respected in the Aga world and holds frequent demonstrations over zoom and in person.
You could attend one of the official AGA demos if preferred. Your traditional model is most similar to the current R7 models, which have 'always on' ovens but 'on/off' hotplates.
Cleaning Your Aga Cooker:
Cleaning the Hotplates:
Your hotplates will inevitably become scratched and stained after use. It's a normal part of AGA life and it's easier to lower the lids and fill your time making memories instead!
Any burnt-on debris on your cast iron hotplates will eventually carbonise with the high heat and will be able to be brushed away. If you have a stubborn build-up or burnt on residue, you can use some fine-grade steel wool to remove it, to ensure good pan-to-hotplate contact.
Your hotplates are cast iron - don't use any spray cleaners or bleach etc on them!
The lid liners are aluminium and are easily kept clean by wiping them after each use of the hotplate. This prevents any grease hardening or staining taking hold.
Cleaning the Ovens:
The ovens are similar to your hotplates. If anything spits or spills, close the door and leave it to burn itself off. Once it's carbonised, you can brush it out, or hoover out your ovens when the cooker if cold for its regular service/maintenance.
Your ovens are original cast iron - don't use any spray oven cleaners or bleach etc on them!
The door liners are aluminium and will likely become scratched or dented over time. You can choose to replace them if preferred, but you can clean them by wiping up spills with a cloth after use, or using a fine scourer and some astonish paste (which may result in some scratches). Personally, we've found that closing the doors and forgetting about them is much easier!
Cleaning your Enamel:
The vitreous enamel surfaces should be wiped down with a warm damp cloth after each use.
You should only use approved enamel cleaners to prevent any chance of staining or irreparable damage to the enamel finish.
- DO NOT use any sprays with 'power' or 'limescale remover' features, Mr Muscle cleaner sprays or anything similar (ESPECIALLY not barkeepers friend). Your enamel will permanently stain with any acidic or alkaline liquids. This is why tomato-based or milk spills need to be wiped up immediately.
- DO use official AGA Rangemaster enamel cleaner, or original astonish cleaning paste.
If the gloss glaze has accidentally been stripped from the enamel, the only solution is to re-enamel the whole panel at thousands of pounds in cost.
Personally, we use diluted original fairy liquid in a spray bottle with water on our own Aga at home, but use this at your own risk. We've found that most enamel cleaners leave streaks and require 'buffing' after cleaning - life's too short for that!!
For tougher grease built up over time, you might need a 'glass scraper' (widely available online). Wet the surface then hold the scraper at a 45 degree angle and carefully scrape the grease off without lifting the scraper. Make sure you change the blade regularly to prevent any scratching.
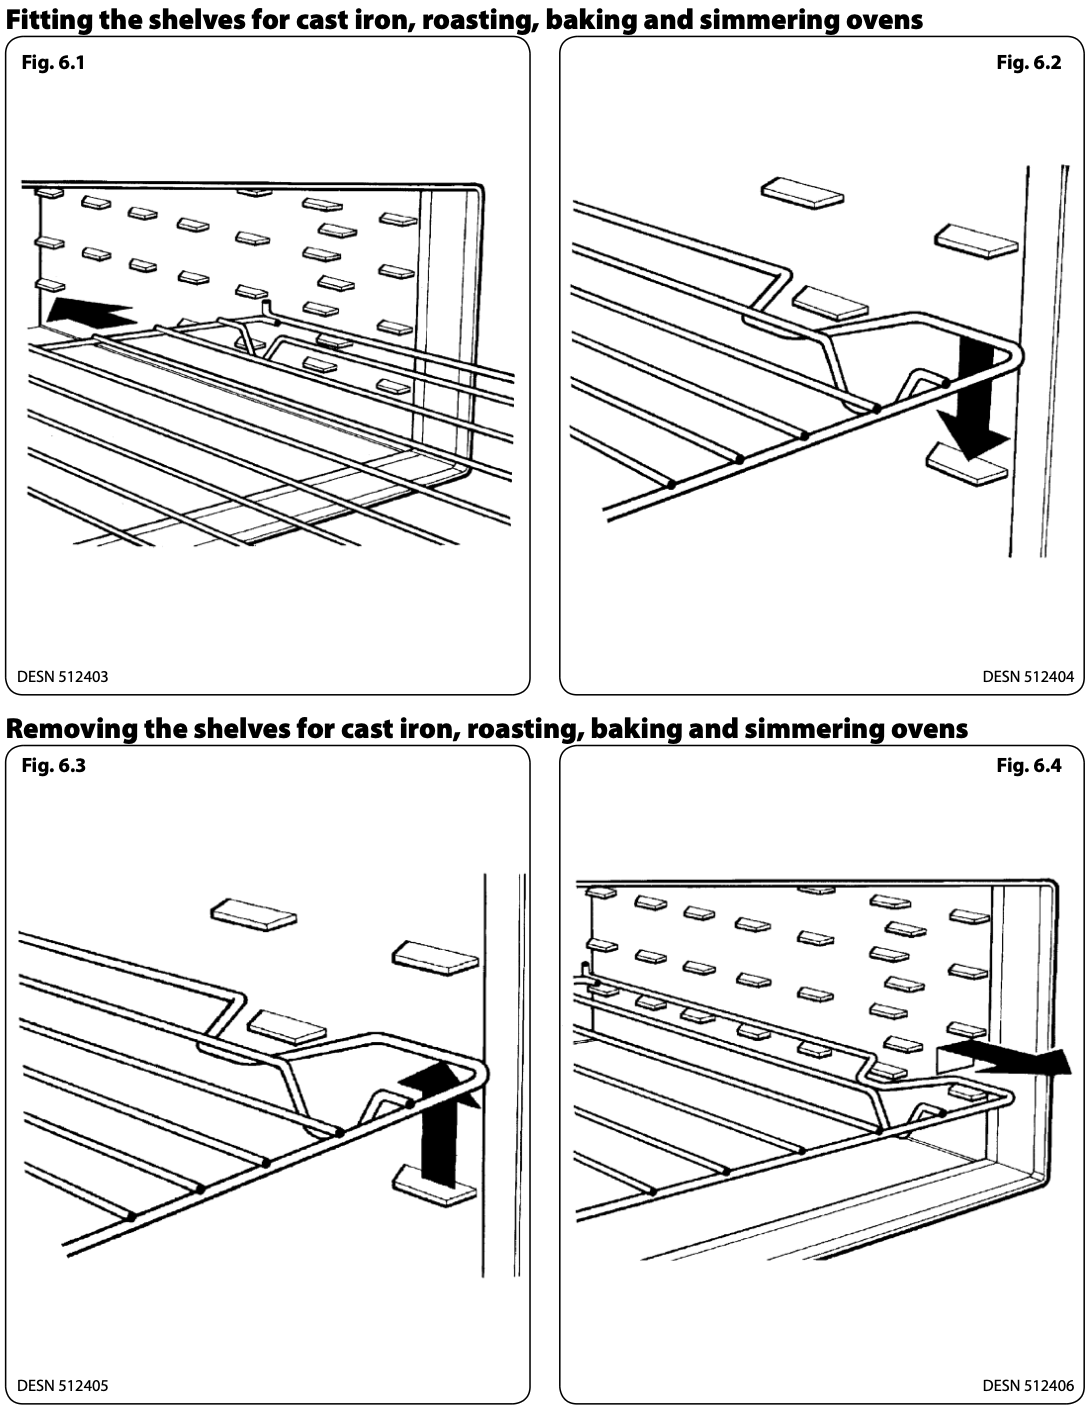
Using Your Oven Shelves
Your chrome oven shelves have 'anti-tilt' upstands at the back. These are used to prevent the shelf from accidentally sliding out of the oven when you're checking food etc.
To fit the shelves:
- First, identify the cast iron 'runners' along the side of the oven.
- Between each row, there is an 'odd' runner. This is where you'd place the back of your shelf (make sure it's level and not crooked!).
- Push it towards the back of the oven and the shelf will fall through the 'odd' runner.
- Pull your shelf forward and you'll see the little upstands will catch on the 'odd' runner.
To remove the shelves:
- As above, identify the cast iron runners your shelf is seated on.
- Using oven gloves, lift the shelf above the 'odd' runner and slide it forward.
- This will bypass the anti-tilt design and your shelf will slide out.
Your metal solid shelf is called your 'cold plain shelf'. This can be used to deflect heat from the ovens, to reduce the temperature in that oven (rather than turning your whole cooker down). It must be kept outside of your ovens, so that it's cold before use.
The heat will rise from your burner, into your boiling plate, across to your simmer plate and down through your ovens. If you wanted to reduce the temperature of your top or bottom oven, slide this shelf (it must be cool!) into the oven, above your food, and it'll slow down the heat transfer into the food.
Your Warranty
Our fully refurbished Aga Cookers are supplied with a 5-year parts warranty (details below).
For Electric Cookers our engineers have build, you'll also have a 12-month labour warranty.
Your chosen Oil and Gas AGA Engineer would usually provide a labour warranty with their work.
You can find details of the warranty and the registration form here: www.saltirecookers.com/warranty.
If you need us for anything in the future, just get in touch!
hello@saltirecookers.com
01224 044 601